树莓派(RaspberryPi 3/4)基于CentOS搭建Cacti1.2.16
对于运营商、IDC和大型互联网企业来说,网络流量管理监控是必不可少的,主流的应用软件大多是cacti和zabbix,从开放和功能扩展上zabbix更强大,同时商业化味道也比较浓烈。但个人工作使用上习惯了Cacti。zabbix我比较喜欢的是通过阀门值触发执行shell脚本,例如调用shell对交换机远程操作。
RouterOS也带有自己的流量监控工具graping,以及The Dude工具上的流量监控。我对/tool graping定义是只能看,不能用。The Dude监控软件的确是很不错,而且windows版本免费,但在MikroTik手里烂尾了,The Dude在流量管理和网络设备业务支撑方面比起Cacti和zabbix太小儿科了。
Cacti 是一套基于PHP、MySQL、SNMP 及 RRDTool 开发的网络流量图形分析工具。它通过 snmpget 来获取数据,使用 RRDtool 绘画图形,提供了非常强大的数据和用户管理功能,除了基本的 Snmp 流量跟系统监控外,Cacti 也可外挂 Scripts 及加上 Templates 来作出各式各样的监控图。
网上有很多x86平台搭建的Cacti教程,由于家里的网络需要看看流量,就把闲置的树莓派安装上Cacti,树莓派官方的系统是debian,但工作中自己用的基本是CentOS,移植过程比较麻烦,还好CentOS有基于树莓派的系统,下面的Cacti安装我自己的树莓派3/4经过测试过,能正常使用。
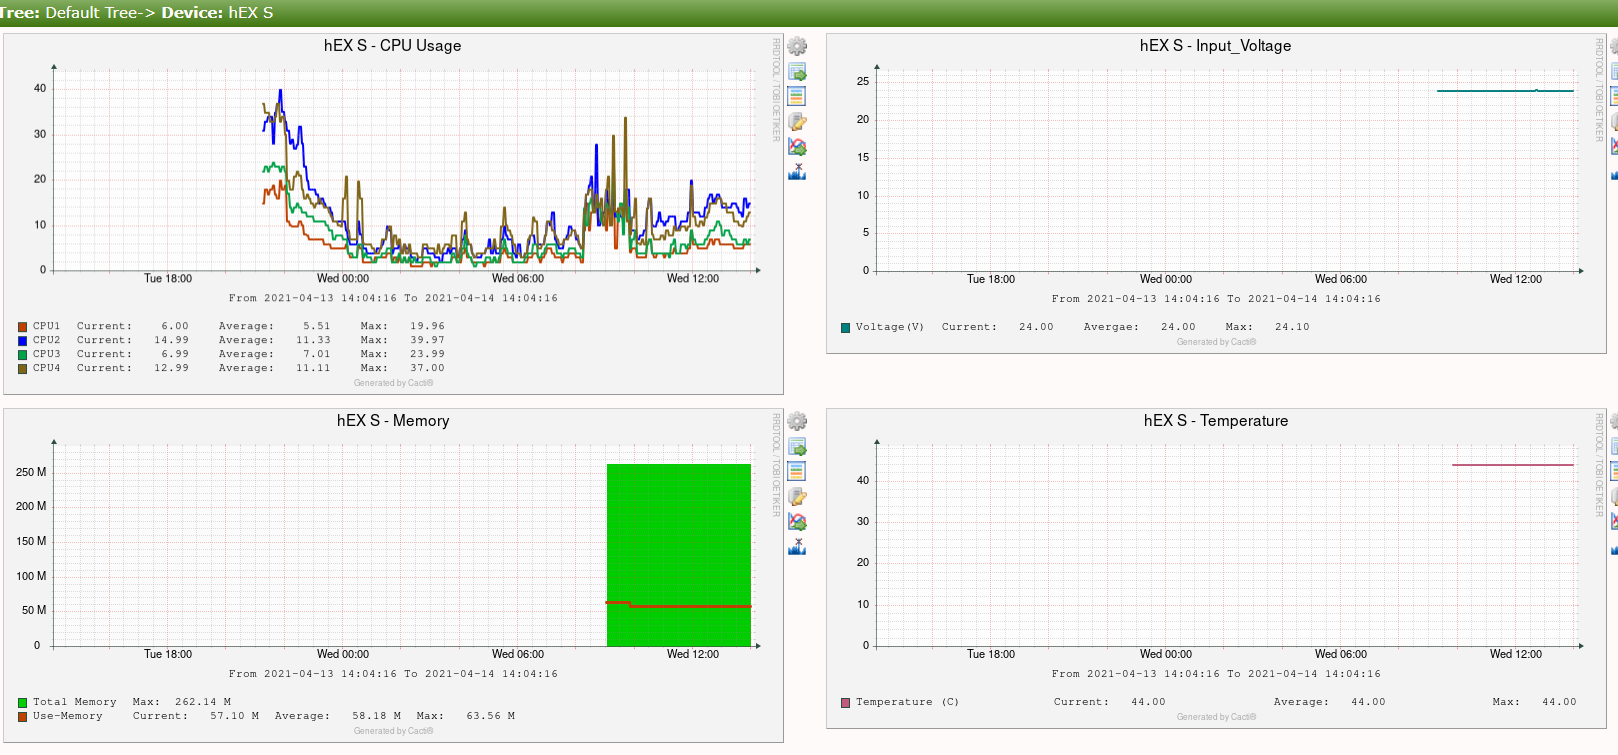
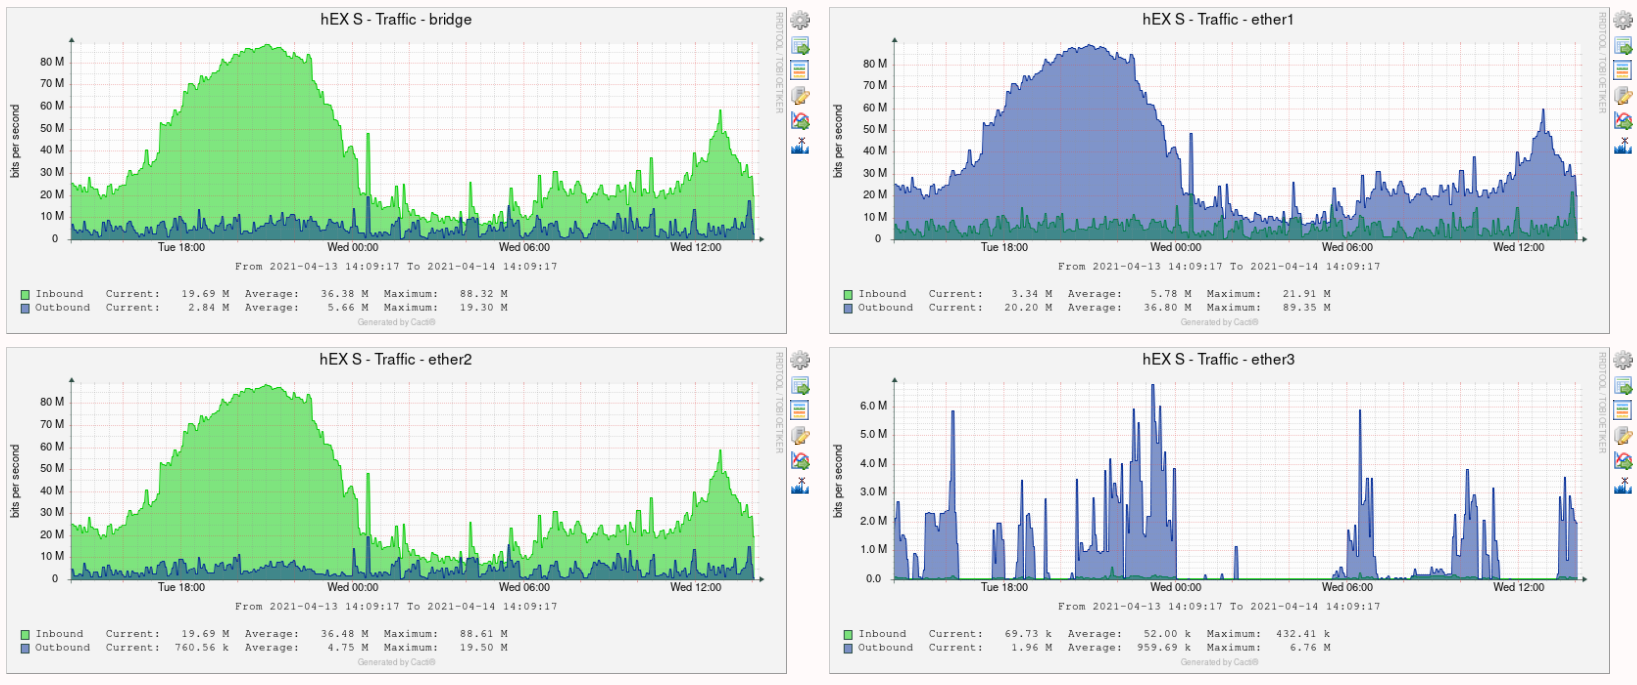
下图是通过Cacti,通过snmp采集MikroTik hEX S的数据,包括CPU(4核分别采集)、电压,内存和温度,以及网卡流量


准备工作
下载镜像文件,CentOS官网可以下载到RaspberryPi CentOS8的镜像文件:
特别提醒:本次安装基于CentOS 8.2版本,更高版本安装存在差异。
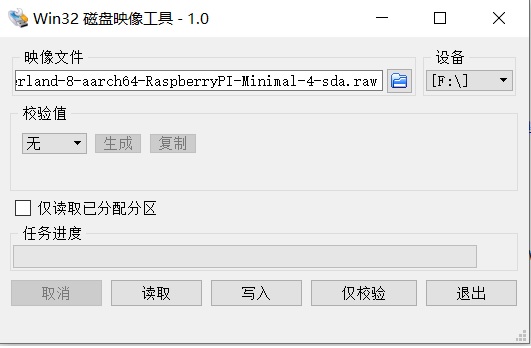
解压镜像文件后,使用Win32磁盘映像工具,将镜像写入SD卡:

写入成功后,将SD卡插入树莓派3/4上,通电启动
CentOS启动后,默认网卡配置是自动获取IP,无需接显示器配置,通过查看路由器树莓派获取的IP地址,使用ssh登录树莓派的CentOS8系统,账号root,默认密码是:centos
登录后,要做的第一件事情是扩展根分区,默认情况下CentOS8在树莓派的根分区很小只有2.2G,剩余的空间未分配,2.2G空间对于系统来说太小了,安装开发包的空间都不够,需要扩展根分区空间。我是32G的SD卡,有27G未分配,通过fdisk查看,SD卡磁盘名称是mmcblk0,具体操作如下:
使用growpart /dev/mmcblk0 3 (注意这里是mmcblk0 ‘空格’ 3),此步骤将余下未分配的空间扩展到/dev/mmcblk0p3
# growpart /dev/mmcblk0 3
CHANGED: partition=3 start=1593344 old: size=4687872 end=6281216 new: size=59068383,end=60661727
使用resize2fs命令 ,拉伸一下分区,
# resize2fs /dev/mmcblk0p3
resize2fs 1.45.4 (23-Sep-2019)
Filesystem at /dev/mmcblk0p3 is mounted on /; on-line resizing required
old_desc_blocks = 1, new_desc_blocks = 4
The filesystem on /dev/mmcblk0p3 is now 7383547 (4k) blocks long.
以上两条命令完成根分区扩容
配置MariaDB yum源
CentOS8的yum/dnf源我默认使用官方,因为国内没有找到合适基于ARM构架的centOS8 yum源,华为镜像站点也只有centOS7的ARM源,而且MariaDB 5.5.68和PHP 5.4.16版本都比较老,cacti 1.2.16建议MariaDB使用更高的版本。
扩展MariaDB官方的yum源
MariaDB对于ARM平台,只有CentOS8的,按照官方的文档创建yum原配置文件
# vi /etc/yum.repos.d/MariaDB.repo
输入以下内容:
[mariadb]
name = MariaDB
baseurl = http://yum.mariadb.org/10.4/centos8-aarch64
module_hotfixes=1
gpgkey=https://yum.mariadb.org/RPM-GPG-KEY-MariaDB
gpgcheck=1
wq保存退出
yum/dnf安装相关应用和需要的开发包
首先禁用selinux
# setenforce 0
# sed -i 's/SELINUX=enforcing/SELINUX=disabled/g' /etc/selinux/config
Yum安装需要的工具和开发包
# yum -y install wget lm_sensors gcc gcc-c++ zlib-devel libpng-devel freetype-devel glib2-devel pcre-devel pango-devel cairo-devel libxml2-devel perl-ExtUtils-CBuilder perl-ExtUtils-MakeMaker autoconf automake binutils libtool cpp glibc-headers kernel-headers glibc-devel make
yum http和php
# yum -y install httpd php php-common php-bcmath php-cli php-gd php-gmp php-intl php-json php-ldap php-mbstring php-pdo php-pear php-snmp php-process php-xml php-zip php-mysqlnd
yum snmp
# yum -y install net-snmp net-snmp-libs net-snmp-utils net-snmp-devel net-snmp-perl
yum安装rrdtool工具和mysql-devel
# yum install -y rrdtool rrdtool-perl perl-CPAN perl-YAML mysql-devel
spine需要help2man,centos的yum无法安装,通过dnf获取
# dnf --enablerepo=PowerTools install help2man
注意:CentOS 8.3后,如果dnf通过PowerTools无法安装help2man,可以通过yum install help2man
dnf安装MariaDB数据库
# dnf install MariaDB-server
编译安装spine
下载spine轮询器
# wget https://www.cacti.net/downloads/spine/cacti-spine-1.2.16.tar.gz
编译安装
# tar xf cacti-spine-1.2.16.tar.gz
# cd cacti-spine-1.2.16/ && sh bootstrap && ./configure && make && make install
spine程序软链接到/usr/bin下
# ln -s /usr/local/spine/bin/spine /usr/bin/spine
编辑配置文件
# vi /usr/local/spine/etc/spine.conf
配置参数如下:
DB_Host         localhost
DB_Database     cacti
DB_User         cactiuser
DB_Pass         cactiuser
DB_Port          3306
DB_PreG         0
wq保存退出
安装cacti1.2.16
下载cacti-1.2.16
# wget https://www.cacti.net/downloads/cacti-1.2.16.tar.gz
解压到/var/www/html目录下
# tar zxvf cacti-1.2.16.tar.gz -C /var/www/html --strip-components=1
cacti修改文件权限
# chown -R apache:apache /var/www/html
在crond.d下cacti计划任务,poller轮询获取数据,每5分钟执行一次
# vi /etc/cron.d/cacti

*/5   *     *     *      *   apache /usr/bin/php /var/www/html/poller.php > /dev/null 2>&1
# chmod 644 /etc/cron.d/cacti
配置httpd和php
创建httpd配置文件
# vi /etc/httpd/conf.d/cacti.conf
写入如下配置
Alias /cacti /var/www/html
<Directory "/var/www/html">
 Options FollowSymLinks
 AllowOverride None
  <IfModule mod_php7.c>
    php_value max_execution_time 300
    php_value memory_limit 256M
    php_value post_max_size 128M
    php_value upload_max_filesize 128M
    php_value max_input_time 300
    php_value always_populate_raw_post_data -1
    php_value date.timezone Asia/Shanghai
  </IfModule>
</Directory>
wq保存退出
更新httpd参数
# sed -i 's/Timeout 60/Timeout 600/'  /etc/httpd/conf/httpd.conf
# sed -i 's/KeepAliveTimeout 15/KeepAliveTimeout 600/'  /etc/httpd/conf/httpd.conf
# sed -i 's/DirectoryIndex index.html/DirectoryIndex index.php/'  /etc/httpd/conf/httpd.conf
更新php.ini参数
# sed -i 's/memory_limit = 128M/memory_limit = 512M/' /etc/php.ini
# sed -i 's/max_execution_time = 30/max_execution_time = 60/' /etc/php.ini
# echo "date.timezone = Asia/Shanghai " >> /etc/php.ini
配置mariadb数据库
启动数据库
# systemctl start mariadb
查看数据库状态
# systemctl status mariadb
通过mysql_secure_installation初始化数据库和root密码,通过导航配置提示如下:
# mysql_secure_installation
Enter current password for root (enter for none):  << 输入当前root密码,直接回车
OK, successfully used password, moving on...

...

Switch to unix_socket authentication [Y/n] N  <<禁用Unix socket身份验证,启用密码身份验证
... skipping.

...

You already have your root account protected, so you can safely answer 'n'.

Change the root password? [Y/n] Y  << 设置root密码

New password:  << 输入密码
Re-enter new password:  << 再次输入
Password updated successfully!
Reloading privilege tables..
... Success!

...

Remove anonymous users? [Y/n] Y  << 删除Anonymous用户
... Success!

...

Disallow root login remotely? [Y/n] Y  << 禁用root远程登录
... Success!

...

Remove test database and access to it? [Y/n] Y  << 删除test数据库

- Dropping test database...
... Success!

- Removing privileges on test database...
... Success!

...

Reload privilege tables now? [Y/n] Y  <<  刷新
... Success!

...

Cleaning up...
Thanks for using MariaDB!
以上的初始化配置,可以通过下面脚本一次输入,root密码设置为123456:
echo -e "\nn\ny\n123456\n123456\ny\ny\ny\ny\n" | mysql_secure_installation
配置数据的时区,创建cactiuser账号,创建cacti数据库并从cacti配置文件导入数据库模板,
# mysql_tzinfo_to_sql /usr/share/zoneinfo/Asia/Shanghai Shanghai | mysql -u root -p123456 mysql
# mysql -uroot -p123456 -e "CREATE database cacti default character set utf8;"
# mysql -uroot -p123456 -e "grant all on cacti.* to cactiuser@localhost identified by 'cactiuser';"
# mysql -uroot -p123456 -e "grant select on mysql.time_zone_name to 'cactiuser'@'localhost' identified by 'cactiuser';"
# mysql -uroot -p123456 -e "use cacti; source /var/www/html/cacti.sql;"
# mysql -uroot -p123456 -e "ALTER DATABASE cacti CHARACTER SET utf8mb4 COLLATE utf8mb4_unicode_ci;"
# mysql -uroot -p123456 -e "flush privileges;"
server.cnf配置
编辑vi /etc/my.cnf.d/server.cnf ,在[mysqld]写入以下参数
# this is only for the mysqld standalone daemon
[mysqld]
collation-server=utf8mb4_unicode_ci
character-set-server=utf8mb4
max_heap_table_size=32M
tmp_table_size=32M
join_buffer_size=256M
# 25% Of Total System Memory
innodb_buffer_pool_size=1G
# pool_size/128 for less than 1GB of memory
innodb_buffer_pool_instances=10
innodb_flush_log_at_timeout=3
innodb_read_io_threads=32
innodb_write_io_threads=16
innodb_io_capacity=5000
innodb_io_capacity_max=10000
innodb_file_format = Barracuda
innodb_large_prefix = 1
应用服务配置
防火墙允许http服务
# firewall-cmd --permanent --add-service=http
# firewall-cmd --reload
对各个应用设置开机启动
# systemctl enable mariadb
# systemctl enable httpd
# systemctl enable crond
# systemctl enable snmpd
重启各个应用服务
# systemctl restart mariadb
# systemctl restart httpd
# systemctl restart crond
# systemctl restart snmpd
执行一次poller,测试是否正常,/var/www/html会生成log日志
# /usr/bin/php /var/www/html/poller.php
由于/var/www/html/log里生成了log日志文件,权限是rooot,需要再一次修改cacti文件的权限
# chown -R apache:apache /var/www/html
以上配置完成后,可以通过在浏览器上输入IP地址访问cacti,首次登录cacti默认账号和密码都是admin,Cacti1.2.16安装向导设置
x86安装
如果是基于x86平台安装Cacti 1.2.16,需要对以下配置做修改
特别提醒:本次安装基于CentOS 8.2版本,更高版本安装存在差异。
Base镜像如果不使用CentOS官方,可以选择华为镜像yum源
1、备份配置文件:
cp -a /etc/yum.repos.d/CentOS-Base.repo /etc/yum.repos.d/CentOS-Base.repo.bak
2、下载华为镜像配置文件(wget需要提前yum安装):
下载新的CentOS-Base.repo文件到/etc/yum.repos.d/目录下,执行如下命令:
wget -O /etc/yum.repos.d/CentOS-Base.repo https://repo.huaweicloud.com/repository/conf/CentOS-8-reg.repo
需要将Mariadb数据库yum源配置文件/etc/yum.repos.d/MariaDB.repo修改为:
[mariadb]
name = MariaDB
baseurl = http://yum.mariadb.org/10.4/centos8-amd64
module_hotfixes=1
gpgkey=https://yum.mariadb.org/RPM-GPG-KEY-MariaDB
gpgcheck=1


